wp get category:Introduction
WordPress is an applicable content management system ( CMS) that can offer a range of skills to administer your site. One of these features is Training, which helps identify and categorize content and multiple Things in media, like Tags and the Media Library. This article will guide you through the pieces and bobs of WordPress classes, tags, and the media library, presenting step-by-step instructions and helpful pointers.
What are WP Categories?
Categories in WordPress link associated posts together. They help you set up your content and make it easier for website visitors to navigate your website online. Categories are hierarchical, which means you can create classes and subcategories.
How to Create and Manage Categories
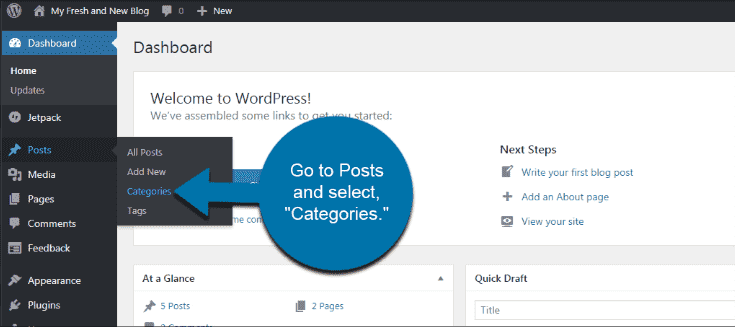
Log in to your WordPress dashboard.
Navigate to Posts > Categories.
Add a New Category:
Fill in the call of the class.
Add a slug (URL-friendly version of the class call).
Choose a parent class if you want to create a subcategory.
Write a description (optional).
Click “Add New Category.”
Benefits of Using Categories
Improved Navigation:
Assists guests in finding related content quickly.
search engine marketing Benefits:
Search engines can understand the layout of your website.
Organization of Content:
Maintains your posts organized and smooth to control.
Exploring WordPress Tags
Tags in WordPress are similar to classes but are used for more unique topics. They are non-hierarchical and allow you to provide more precise statistics about your posts.
How to Create and Manage Tags
Login in your WordPress dashboard.
Navigate to Posts > Tags.
Add a New Tag:
Enter the call of the tag.
Add a slug.
Write an outline
Click “Add New Tag.”
Benefits of Using Tags
Enhanced Searchability:
Tags help website visitors find posts on particular topics.
Content Arrangement:
Enables the unique categorization of posts.
Search engine marketing Benefits:
Tags can improve the visibility of your posts in search engine results.
| Feature | Categories | Tags |
| Hierarchical | Broad grouping of post | No |
| Used for | Broad group of posts | Special topic within posts |
| SEO Impact | Significant | Moderate |
| Navigation Aid | Yes | Yes |
| URL Structure | Includes category in URL | Does not include tag in URL |
| Best For | Organizing main section of content | Adding specific keyword to posts |
Managing the Media Library in WordPress
The media library in WordPress is where you keep all your snapshots, movies, audio files, and documents. It’s a crucial device for managing and organizing your media documents.
How to Access the Media Library
Login in your WordPress dashboard.
Navigate to Media > Library.
Adding Files to the Media Library
Click on “Add New.”
Drag and Drop Files:
Drag files out of your computer and upload them into the region.
Select Files:
Click “Select Files” and choose documents on your laptop.
Organizing Media Files
Use Folders:
Install plugins like “WP Media Folder” to create folders in the media library.
Add Titles and Descriptions:
Provide descriptive titles and descriptions to make files less challenging to find.
Use Categories and Tags:
Apply categories and tags to media files for better company.
Tips for Effective Media Management
Optimize Images:
Compress photos before importing to improve website online speed.
Use Descriptive Names:
Name your files descriptively for better search engine optimization and less complicated identification.
Regular Clean-Up:
Periodically evaluate and delete unused media files to keep area.
Effective Use of Categories and Tags in WordPress
Organizing your content efficiently enhances customer pleasure and SEO (search engine marketing) for your WordPress website online. Categories and tags are two essential tools that assist in this. Understanding their variations, how to use them efficaciously, and acceptable methods will significantly help your website.
Categories: Broad Grouping of Content
Categories are intended to widen the groupings of your posts. Think of them as the main topics of your online page cover. They help create a hierarchy and organize your material so that it’s easier for people to find their way around and understand your blog’s main points.
How to Use Categories Effectively:
Define Main Topics:
Start by identifying the main points of your weblog’s coverage. For example, a food blog could have classes like Recipes, Restaurant Reviews, and Cooking Tips.
Create a Hierarchical Structure:
Use subcategories to create a more exact system. For example, under the Recipes category, you may have subcategories like Breakfast, Lunch, Dinner, and Desserts.
Limit the Number of Categories:
Too many categories can confuse users and dilute your Organization of information. Aim for five to ten main groups.
Assign Posts Appropriately:
Each put-up should be assigned to the most relevant class. Only assign a put-up to one class once it is needed.
Search engine marketing Benefits:
Categories create a sensible organization for web pages, which search engines like Google and Yahoo can quickly crawl. This improves your site’s search engine optimization by helping search engines understand your content hierarchy.
Tags: Specific Details About Content
Tags are more exact and granular than classes. They describe the details of your posts and help you find topics spanning several categories. Tags are non-hierarchical and can be essential phrases that assist readers in locating posts on unique issues.
How to Use Tags Effectively:
Be Specific:
Use tags to describe specific aspects of your posts. For example, a recipe in this post might have tags like “gluten-free,” “vegan,” or “short meals.”
Use Relevant Keywords:
Choose tags that are relevant to the post’s content material. Avoid using overly broad or frequent tags.
Limit the Number of Tags:
While there may be no strict limit, it’s high-quality to use five-10 tags according to put up. Too many tags can clutter your website and confuse customers.
Avoid Duplication:
Ensure that tags are exact and no longer replicate the content material of classes. As an example, when you have a “Desserts” category, avoid using “cakes” as a tag.
Enhance Navigation:
Tags can help. Unique groups help users find material related to what they are looking for. For example, clicking the “vegan” tag must display all posts mentioning vegan recipes, regardless of their category.
Best Practices for Using Categories and Tags
Organizing Your Content
Plan Your Structure:
Before creating classes and tags, plan how to shape your website online. Consider the main topics and unique details you want to highlight.
Consistent Naming Conventions:
Use regular naming conventions for classes and tags to preserve a professional and get-ready look.
Regularly Review and Update:
Periodically review your categories and tags to ensure they still apply. Update or merge categories and tags as necessary to keep your content organized.
Enhancing User Experience
Clear Navigation Menus:
Use classes to create clear navigation menus. This will help guests find information quickly and improve their overall experience on your website.
Tag Clouds and Widgets:
Utilize tag clouds and widgets to display popular tags. This can encourage users to check out more stuff and increase engagement.
Improving search engine marketing
Keyword Research:
Conduct keyword keyword studies to identify famous search terms related to your content. Use these to improve your search engine performance, such as words as classes and tags.
Avoid Keyword Stuffing:
While applying relevant keywords is essential, avoid keyword stuffing. Use categories and tags clearly and in a way that makes sense for your work.
Examples of Effective Use of Categories and Tags
Example 1: Travel Blog
Categories:
Destinations
Europe
Asia
America
Travel Tips
Travel Gear
Travel Stories
Tags:
Backpacking
Luxury Travel
Budget Travel
Adventure Travel
Solo Travel
Family Travel
Example 2: Technology Blog
Categories:
Reviews
Gadgets
Software
Apps
How-To Guides
News
Opinion
Tags:
Android
iOS
Windows
Mac
Cyber security
AI
Managing and Organizing Media Assets in the WordPress Media Library
The WordPress Media Library is essential for managing pics, videos, audio files, and other media belongings on your internet site. Proper Organization and management of this property can decorate your web page’s overall performance, enhance search engine optimization, and make it less complicated for you and your group to correctly discover and use media documents. This guide explores designated techniques and first-class practices for coping with and organizing media property within the WordPress Media Library.
Accessing the Media Library
To start handling your media belongings, you first want to get the right to enter the Media Library.
Login in your WordPress dashboard.
Navigate to Media > Library.
Here, you will see a grid or listing view of all the media files uploaded to your website.
Uploading Media Files
You can add media files to the Media Library without delay or at the same time as growing posts and pages.
Direct Upload:
Go to Media > Add New.
Click “Select Files” to select files from your computer, or drag and drop documents into the Add area.
Upload While Editing Posts/Pages:
In the publish or web page editor, click the “Add Media” button.
Select “Upload Files” and drag and drop your documents or choose them from your PC.
Organizing Media Files
Organizing your media documents is essential for preserving a green workflow. Here are some powerful strategies:
Use Folders (With Plugins)
WordPress does not now assist folders by default, but you can add this functionality with plugins. One famous plugin is “WP Media Folder.”
Install WP Media Folder:
Go to Plugins > Add New.
Search for “WP Media Folder.”
Install and prompt the plugin.
Create Folders:
Navigate to Media > Library.
Click on “Add Folder” to create a new folder.
Drag and drop files into the folder for better company.
Add Titles, Captions, and Descriptions
Providing descriptive data for every media report could make living documents easier.
Edit File Details:
Click on a media document in the library to open the “Attachment Details” window.
Add an identity, caption, alt textual content, and description.
Click “Save.”
Use Media Categories and Tags (With Plugins)
Like posts, you can categorize and tag media documents using plugins like “Media Library Categories” and “Enhanced Media Library.”
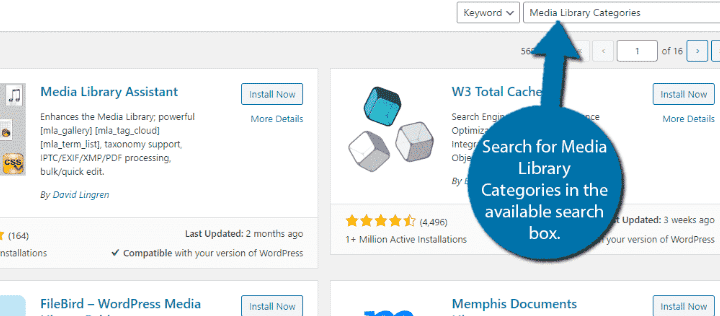
Install Media Library Categories Plugin:
Go to Plugins > Add New.
Search for “Media Library Categories.”
Install and prompt the plugin.
Categorize Media Files:
Open the media report in the library.
Assign a category within the “Media Categories” segment.
Click “Update.”
Optimizing Media Files
Optimizing your media documents can significantly enhance your site’s performance.
Compress Images
Large picture documents can slow down your web page. Use plugins like “Smush” or “EWWW Image Optimizer” to compress photos without losing quality.
Install Smush Plugin:
Go to Plugins > Add New.
Search for “Smush.”
Install and activate the plugin.
Compress Images:
Go to Media > Smush.
Click “Bulk Smush” to compress existing pics.
Enable “Automatic Smush” for Destiny Uploads.
Use Appropriate File Formats
Choose the correct record format for extraordinary styles of media:
JPEG:
Best for snapshots and photos with many colors.
PNG:
Ideal for photographs with prominent backgrounds or text.
GIF:
Use for easy animations.
SVG:
Best for scalable vector photos.
MP4:
Recommended for movies.
Resize Images
Resize pics to appropriate dimensions before importing them. This reduces report size and improves load instances.
Use an Image Editor:
Use equipment like Photoshop, GIMP, or online editors like Canva to resize photos.
Save the resized photo and upload it to the Media Library.

Managing and Deleting Unused Media Files
Over time, your Media Library may accumulate unused or replica documents. Regularly remove those documents to free server space and keep your library organized.
Identify and Delete Unused Files
Use Media Cleaner Plugin:
Go to Plugins > Add New.
Search for “Media Cleaner.”
Install and set off the plugin.
Scan for Unused Files:
Go to Media > Cleaner.
Run an experiment to pick out unused files.
Review the outcomes and delete pointless documents.
Enhancing Media Library Search and Filtering
Improving the search and filtering abilities of your Media Library can prevent time when searching out precise documents.
Use Enhanced Media Library Plugin
Install Enhanced Media Library Plugin:
Go to Plugins > Add New.
Search for “Enhanced Media Library.”
Install and prompt the plugin.
Enable Enhanced Features:
Go to Settings > Media Library.
Enable additional filters and search capabilities.
Save changes.
Backup and Restore Media Library
Regular backups ensure you can repair your media documents if something goes wrong.
Use Backup Plugins
Install UpdraftPlus Plugin:
Go to Plugins > Add New.
Search for “UpdraftPlus.”
Install and activate the plugin.
Configure Backups:
Go to Settings > UpdraftPlus Backups.
Set up a regular backup timetable.
Include the “Uploads” listing in your backups to ensure media files are sponsored.
Image Search Engine Marketing Considerations: A Detailed Guide
Optimizing images for search engines like Google and Yahoo is integral to standard search engine optimization. It is also known as picture SEO. When pictures are correctly organized, they can speed up page loads, make users happier, and significantly boost your page’s search engine results. This guide will delve into critical image search engine marketing issues, presenting unique tactics and excellent habits.
Importance of Image SEO
Images are more than visual content; they drive organic traffic, improve engagement, and support SEO efforts. Here are some key reasons why photo search engine marketing is critical:
Enhanced User Experience:
Well-optimized pictures load faster and offer a higher personal experience.
Improved Page Load Speed:
Optimized photographs reduce page load times, essential for each consumer experience and search engine optimization.
Increased Organic Traffic:
Properly optimized images can rank in Google Image Search, Bringing more natural people to your website.
Accessibility:
Using descriptive alt-textual content enables visually impaired customers to understand the content material of photographs through display screen readers.
Key Image SEO Considerations
Choosing the Right File Format
Selecting the proper report format for your photographs is the first step in optimization. Standard photograph formats consist of:
JPEG:
Best for images and photos with many colors. Offers a good stability between fine and file length.
PNG:
PNG is the best format for pictures that need to be see-through or have text. PNG files are usually more significant than JPEG files, but they get better grades.
GIF:
Used for easy animations. They have limited coloring alternatives and are quality for tiny, easy graphics.
SVG:
Scalable Vector Graphics are best for trademarks and icons. They are resolution-independent and usually have smaller report sizes.
Image Compression
Compressing pictures reduces record length without significantly affecting the best, which improves page load times. Tools and plugins for photograph compression include:
Online Tools:
TinyPNG, JPEG-Optimizer, Compressor.Io.
WordPress Plugins:
Smush, EWWW Image Optimizer, ShortPixel.
Steps to Compress Images:
Using Online Tools:
Upload your picture to the device.
Download the compressed model.
Upload the compressed image on your WordPress web page.
Using WordPress Plugins:
Install and prompt the plugin.
Configure settings to robotically compress images upon upload.
Use the plugin’s bulk optimization feature to compress current snapshots.
Image Dimensions and Scaling
Upload pictures with the best sizes to avoid useless scaling. This ensures the image successfully deals with unique gadgets and display screen sizes.
Scale Images:
Determine Required Dimensions:
Identify the size wanted in your internet site layout.
Resize Images Before Uploading:
Use photo editing software like Photoshop, GIMP, or online equipment like Canva.
Save the resized image and upload it to your site.
File Naming Conventions
Use descriptive, keyword-rich filenames for your pictures. This will help engines like Google apprehend the image’s content and improve search engine marketing.
Best Practices for File Naming:
Use hyphens to separate words (e.g., “chocolate-cake-recipe.Jpg”).
Avoid using spaces or underscores.
Include relevant key phrases.
Alt Text (Alternative Text)
Alt textual content offers a textual description of the image, which attracts search engines like Google and Yahoo and improves accessibility.
Writing Effective Alt Text:
Be descriptive and concise.
Include relevant keywords keywords.
Avoid keyword keyword stuffing.
Describe the photo if you explain it to someone who can not see it.
Example:
Good Alt Text: “Chocolate cake with strawberries on top.”
Bad Alt Text: “Cake dessert strawberries scrumptious.”
Image Titles and Captions
Image titles and captions can provide extra context and improve search engine marketing.
Best Practices for Titles and Captions:
Image Titles:
Often derived from the filename. Keep it concise and descriptive.
Captions:
These are used to offer context or extra data. They are often displayed below the photo and might beautify the person’s engagement.
Structured Data for Images
Using based information (schema markup) enables search engines to comprehend the content material of your pix better and improves the chances of performing in rich snippets.
How to Add Structured Data:
Use Schema.org Markup:
Add relevant schema markup to your HTML.
WordPress Plugins:
Use plugins like Schema & Structured Data for WP & AMP. To feature structured information without coding.
Image Sitemaps
A photo sitemap enables engines like Google to find and index your images. It presents facts about the snapshots for your website, enhancing their visibility in search effects.
Creating an Image Sitemap:
Using Yoast SEO Plugin:
Go to SEO > General > Features.
Ensure “XML sitemaps” is enabled.
Submit the sitemap to Google Search Console.
Manually Creating an Image Sitemap:
Follow Google’s guidelines to create a picture sitemap manually.
Submit the sitemap to Google Search Console.
Lazy Loading
Lazy loading defers the loading of snapshots until they’re desired (i.e. when they appear in the viewport). This method improves web page load times, and consumers revel in it.
Implementing Lazy Loading:
WordPress Plugins:
Use plugins like a3 Lazy Load or Lazy Load using WP Rocket.
Manual Implementation:
Add the loading=”lazy” attribute in your picture tags.
Conclusion
In the end, effectively using WordPress classes and tags, dealing with and organizing media property inside the media library, and optimizing pictures for SEO are all essential for maintaining a properly established, excessive-acting website. By imposing these techniques, you can decorate user experience, make the website better navigation, increase seek engine scores, and ensure your content is both reachable and tasty. Proper employer and optimization are no longer the most effective way to streamline content material control, but they also make a big difference in the general success of your WordPress website online.